When done with care and attention to detail, tile installation can completely transform a space. Tiles add sophistication, durability, and value to homes, making them a popular choice for floors, walls, and backsplashes. For homeowners in Centereach, a well-executed project ensures both beauty and functionality. By following a clear step-by-step approach, one can avoid common pitfalls and achieve a flawless finish that stands the test of time.
Planning the Tile Installation
Every successful project begins with careful planning. Before diving in, homeowners in Centereach should assess their goals for the space.
- Measuring the area accurately: This determines the number of tiles, the adhesive quantity, and the grout required. Extra tiles should be factored in to account for breakage and cutting.
- Choosing the correct type of tile: Consider whether the area is high-traffic, prone to moisture, or purely decorative. Porcelain and ceramic tiles are excellent choices for durability, while natural stone adds elegance.
- Preparing the surface thoroughly: Any surface, whether wall or floor, must be clean, smooth, and level. Cracks or uneven patches should be repaired to ensure the tile installation is long-lasting.
Step 1: Gathering the Tools and Materials
No tile installation can be executed successfully without the right tools. In Centereach, homeowners often rely on local hardware stores for supplies, but having a complete checklist makes preparation easier.
- Tile cutter or wet saw: For clean and precise cuts.
- Notched trowel: Ensures the adhesive spreads evenly.
- Tile spacers: Help maintain uniform spacing.
- Level: Prevents uneven results and crooked lines.
- Grout float and sponge: For a smooth, polished grout finish.
Proper preparation reduces the risk of errors and saves time during installation.
Step 2: Preparing the Surface
A stable foundation is crucial to achieving a long-lasting tile installation. Skipping this step often leads to cracked or loose tiles down the line.
- Cleaning the area: Remove dust, grease, or old adhesive.
- Leveling the surface: Uneven floors or walls require patching or backer boards for support.
- Moisture considerations: For bathrooms or kitchens in Centereach, waterproofing measures like cement backer boards or membranes may be essential.
Step 3: Laying Out the Tiles
Before applying adhesive, it’s wise to dry-lay the tiles. This step eliminates guesswork and highlights potential cutting challenges.
- Dry layout: Place tiles across the area without adhesive to visualize the final look.
- Chalk guidelines: Mark straight reference lines to keep the pattern consistent.
- Symmetry and aesthetics: Avoid narrow slivers of tiles along edges by adjusting the layout.
In Centereach, where homeowners value both functionality and design, a carefully considered layout ensures the project enhances the home’s overall appeal.
Step 4: Applying the Adhesive
Adhesive application is a critical phase in tile installation.
- Using the correct adhesive: Thin-set mortar is standard for most projects, but specialized adhesives may be necessary for natural stone or glass tiles.
- Even distribution: Spread the adhesive with a notched trowel, holding it at a 45-degree angle to create grooves that help tiles adhere firmly.
- Working in sections: Apply adhesive in small areas to prevent premature drying.
This method ensures tiles stay securely in place and remain aligned throughout the project.
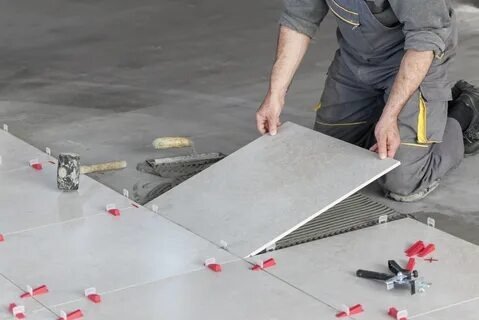
Step 5: Cutting and Fitting Tiles
Rarely does an area fit tiles perfectly without cuts. To achieve a seamless look, precise cutting is required.
- Straight cuts: A manual tile cutter works for simple edges.
- Complex shapes: A wet saw or tile nippers help navigate curves and corners, especially around plumbing fixtures.
- Safety first: Always wear protective gear while cutting to prevent accidents.
For Centereach homeowners upgrading kitchens or bathrooms, clean cuts around cabinets, sinks, and edges enhance the polished finish of the project.
Step 6: Grouting the Tiles
Once the adhesive sets, grouting locks everything in place.
- Choosing grout color: Contrasting grout highlights tile patterns, while matching grout creates a uniform look.
- Application technique: Use a grout float to press grout into the joints firmly.
- Cleaning excess: Wipe away extra grout with a damp sponge before it hardens.
This step not only enhances aesthetics but also prevents moisture from seeping between tiles.
Step 7: Sealing and Finishing Touches
The final step of tile installation is sealing and inspection.
- Applying sealant: Protects grout and tiles from stains and water damage.
- Final polish: Buff away haze left on tiles once the grout dries.
- Quality check: Inspect alignment, level, and spacing for a professional appearance.
For homes in Centereach, sealing is particularly valuable in kitchens and bathrooms, ensuring tiles remain beautiful and durable for years.
Common Mistakes to Avoid
Even with proper guidance, mistakes can occur during tile installation services. Here are the most common pitfalls:
- Neglecting surface preparation
- Applying too much or too little adhesive
- Forgetting expansion gaps along walls
- Rushing grouting without letting the adhesive cure
- Failing to seal grout, leading to staining and damage
Avoiding these ensures a smooth, professional-quality finish.
FAQs
Q1: How long does a typical tile installation take?
Most projects take between 2 and 5 days, including drying and grouting time. Larger spaces may require more time.
Q2: Can tiles be installed over existing flooring?
Yes, provided the existing floor is stable, level, and dry. Otherwise, removal is recommended.
Q3: How often should grout be sealed?
Grout should be sealed every 1–2 years to prevent stains and maintain durability.
Q4: What’s the best way to clean tiles after installation?
Use mild, pH-neutral cleaners and avoid abrasive chemicals that could damage the finish.
Q5: Is professional installation better than DIY?
DIY is possible, but hiring professionals ensures accuracy, durability, and efficiency—especially for larger projects.
Q6: Do tiles add value to homes in Centereach?
Yes, high-quality tile installation enhances a home’s value by improving both durability and aesthetics.